If you’ve followed any of our server setup guides, you’ve seen the phrase “forward the port to your server’s local IP” — but if you’ve never done it before, that instruction can feel like a foreign language. This guide breaks down exactly what port forwarding is, how to actually do it, and how to fix it when it doesn’t work.
What Port Forwarding Actually Does
Your home router sits between your local network and the internet, and by default it blocks incoming connections for security — nobody outside your house can reach your server unless you explicitly allow it. Port forwarding tells your router: “when traffic arrives on this specific port, send it to this specific device on my network.”
Without it, your game server only works for people on your same Wi-Fi. With it, friends anywhere can connect using your public IP address and the right port.
Step 1: Find Your Server’s Local IP Address
Your server needs a static local IP before you set up forwarding — if your router reassigns it later (which happens by default), your forwarding rule silently breaks.
- Windows: Open Command Prompt, run
ipconfig, and look for “IPv4 Address” (something like192.168.1.100) - Mac: System Preferences → Network → Advanced → TCP/IP
- Linux: Run
ip addrorhostname -I
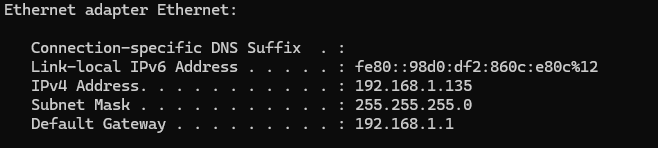
To make it static, either:
- Set a DHCP reservation in your router’s settings (ties that IP permanently to your server’s network hardware address — the more reliable option), or
- Manually configure a static IP on the device itself, if your router doesn’t support reservations
Step 2: Log Into Your Router
- Find your router’s IP address (usually something like
192.168.1.1or192.168.0.1) — often printed on a sticker on the router itself - Enter it in a browser
- Log in with your router’s admin credentials (often
admin/adminoradmin/passwordby default if you haven’t changed it — check your router’s label or manual if those don’t work)
Step 3: Create the Port Forwarding Rule
Look for a section called Port Forwarding, Virtual Server, or sometimes Applications & Gaming — naming varies by router brand.
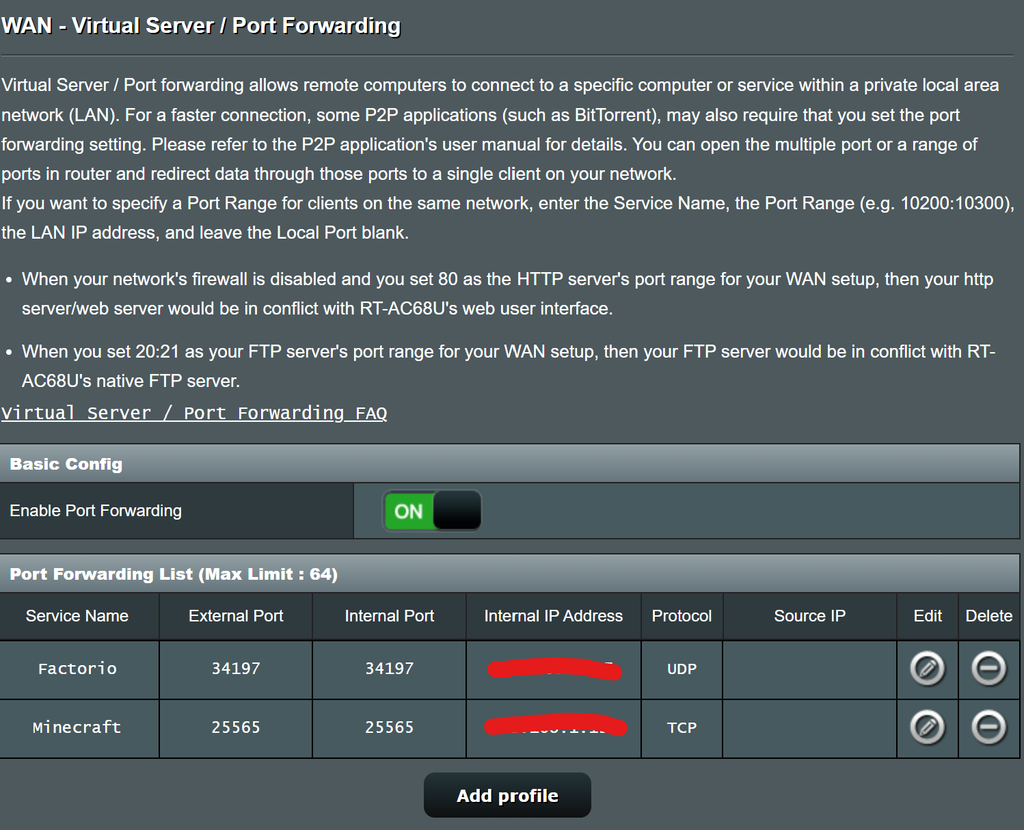

Create a new rule with:
- Service name: anything descriptive (e.g., “Minecraft Server”)
- External/Public port: the port players will connect to (e.g., 25565 for Minecraft)
- Internal/Local port: typically the same number, unless you’re intentionally remapping
- Internal IP address: your server’s static local IP from Step 1
- Protocol: TCP, UDP, or both, depending on what the specific game requires (check your game’s setup guide — Minecraft Java uses TCP, Valheim uses UDP, for example)
Save and apply the changes.
Step 4: Test That It Worked
- Make sure your server is actually running — port checkers only report “open” if something is actively listening on that port
- Find your public IP by searching “what’s my IP”
- Use a port checker tool (like canyouseeme.org) to test whether the port shows as open from outside your network
- If it reports success, share your public IP with friends — they’ll connect using
your.public.ip:port
A note on testing UDP ports: many popular port-checking tools (including canyouseeme.org) are built primarily for TCP and can show a false “timed out” result for UDP ports even when they’re working correctly, since UDP doesn’t respond to connection probes the same way TCP does. If a TCP port test fails, that’s a reliable signal something’s wrong — but a UDP test failing isn’t definitive proof of a problem. The most reliable way to confirm a UDP-based game server (like Valheim) is reachable is simply having someone actually connect to it from outside your network.
Common Problems and Fixes
“It works locally but friends still can’t connect.” This is the most common issue, and it’s almost always one of these:
- CGNAT (Carrier-Grade NAT). Some ISPs don’t give you a true public IP — you’re sharing one with other customers, which makes port forwarding impossible no matter how correctly it’s configured. Check by comparing your router’s WAN IP to what a “what’s my IP” search shows from a device on your network; if they don’t match, you’re likely behind CGNAT. If so, you’ll need to call your ISP about a public IP option, or use a tunneling service as a workaround.
- Double NAT. If your ISP’s modem connects to your own separate router, you may need to forward the port on both devices, or put the ISP modem into bridge mode so only your router handles routing.
- OS-level firewall blocking the connection. Even with correct router forwarding, your computer’s own firewall (Windows Defender, ufw, etc.) can silently block the traffic. Check firewall rules for the relevant port.
- The IP changed. If you didn’t set up a DHCP reservation, your server’s local IP may have shifted after a reboot, breaking the forwarding rule. Double check it still matches what you configured.
“Docker container is running but the port still isn’t reachable.” Make sure you’re forwarding to the Docker host machine’s local IP, not trying to forward directly to the container itself — the container’s ports are already mapped to the host via your -p flag in the docker run command, so the router only needs to know about the host machine.
A Note on Security
Only forward the specific ports your game actually needs — avoid using “DMZ mode” as a shortcut, since that exposes your entire device to the internet rather than just the one service. And if you ever stop running a particular server, remove the forwarding rule rather than leaving it open indefinitely.
Getting Started
Ready to put this into practice? Check out our guides for setting up a Minecraft server or setting up a Valheim server, both of which reference this exact process.